In this tutorial, we will continue with our website created here Create your first website or blog using WordPress.
a. Create the home page and blog page
Go to Dashboard >Pages > Add New, it will take you to the "Add New" Page.
In the title of the page, type "Homepage", go to right side, Under Page Attributes section, Change Template to Front page, then click the "Publish" button.

Once the page is published, add another page by clicking the "Add New" button,
it will take you to the "Add New" Page.
In the title of the page, type "Blog", then click the "Publish" button.
Go to Dashboard > Appearance > Customize, it will take you to the "Customize" page. Scroll to the "Static Front Page" tab, click on it to expand it, you will see the "Front page displays" section, click the "A static page" bullet, you will get a drop down below it, change Frontpage to Homepage, change Posts page drop down to Blog, scroll to the top and click on the "Save & Publish" button. Click on the < button to go back to the customize page.
b. Change slider images on the home page
Scroll to down and click on Header area, it will take you to the Header area section, click the Header type section to expand it, on the "Front page header type" section, select the bullet "Full screen slider", on the "Site header type" section, select the bullet "No header(only menu)".
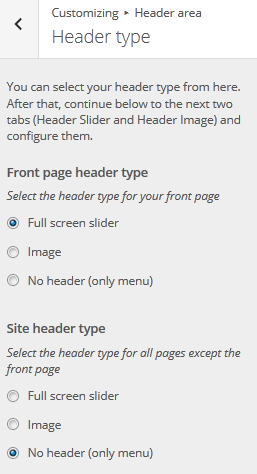
Click on the "Save & Publish" button. Click on the < button to go back to the Header area.
Click the Header Slider section to expand it, you can change the slider speed or leave it at its default value, scroll down to the "FIRST SLIDE" section to change the first sliding image. click on the "Change Image button,

it will pop up the "Select Image" dialog, click on the Media Library tab, select the image you want, click the "Choose Image" button,

if you want to upload a new image that is not in the media gallery, select the upload files tab, click the Select Files button, navigate to the file you want and select it. Let's modify the text for the first image slider, in the "Title for the first slide" text box, change the text to your choice, do the same for the "subtitle for the first slide". You can scroll down and repeat this steps for changing the sliding images and text for the remaining four sliders.
Let's modify the text for the first image slider, in the "Title for the first slide" text box, change the text to your choice, do the same for the "subtitle for the first slide". You can scroll down and repeat this steps for changing the sliding images and text for the remaining four sliders.
Now scroll down further to the section that says "CALL TO ACTION", in the "URL for your call to action button" text box, you can add a URL that will redirect users to another page when they click on the button or you can leave the default "#primary" text, when users click on the button, it will go down to the next section which is the services section. Scroll up and click on the "Save & Publish" button. click the "X" button to go back to the dashboard page.

You can preview your homepage by going to Briltech > Visit Site. Go back to the Dashboard page by going to Briltech > Dashboard.
What Is Next?
Step by Step
This tutorial is part of a series that walks you through creating your first website or blog using WordPress.
Next Step - 5. Customizing the home page
Previous Step - 3. Working with the media library
Start from the beginning - Create your first website or blog using WordPress