Creating a website requires the knowledge of HTML (Hypertext markup language), CSS(cascading style sheet) and javascript, but with content management systems like Joomla, WordPress, blogger e.t.c, you can create websites even if you don't know how to write codes.
Using a content management system, usually abbreviated as "CMS" has its pros and cons. Some of the advantages include; no programming knowledge required to create websites, create websites faster, good for creating blogs, news websites and company's information website. One major disadvantage is that websites built with content management system cannot be customised to add features that are not in the framework of the CMS.
If you want to build an HTML website from scratch without a content management system. Take a look at this post Create your first HTML website from scratch.
In this article, you’ll learn how to first develop websites on your local system before deploying the website to a production server with a registered domain(if you don't know how to register a domain, click here). Developing a website in a local environment has its benefits.
First, if you don't have the money to purchase a hosting account yet, you can design and test the website on your system. Second, you won't always need an Internet connection to design your website as a result of which your development will speed up as you won’t have to wait for files to upload when you make changes.
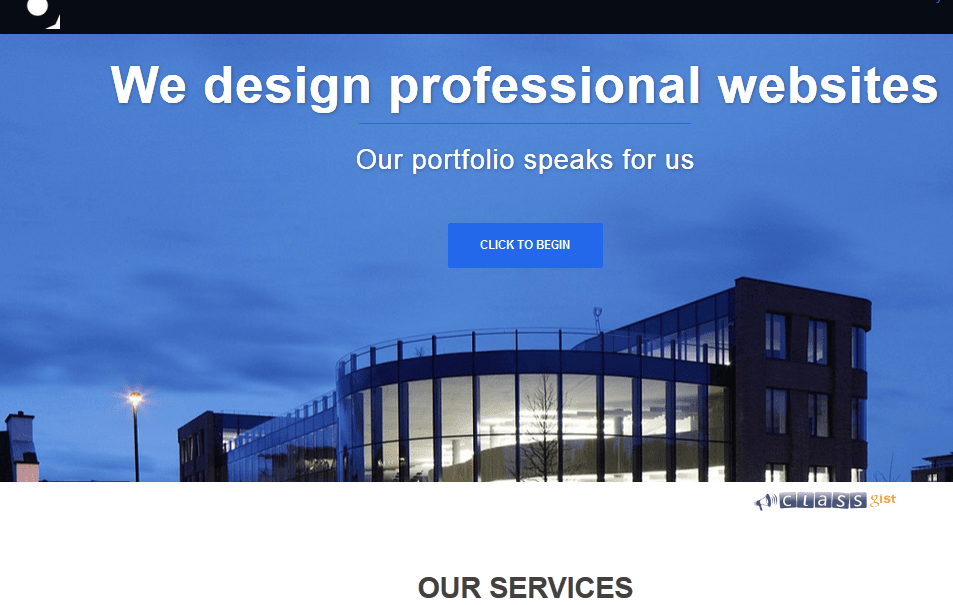
We will be creating a demo website for a dummy company named briltech. Briltech is an information technology company that designs web applications and software for its clients. 
# Step 1: Download and Install Wamp Server
1. Click Download Wampserver, you will be directed to a web page. When the page loads, at the top, you will see an arrow pointing downwards, click to download. Check the progress of your download by pressing CTRL + J on your keyboard. Once the download is complete, copy the downloaded file (WampServer2.1e-x32) to your documents folder
2. Double click on the file to install it. This link how to download and install PHP program will guide you through installation. (Skip to section 2 part 1 of the tutorial.) When you are done installing WampServer, you should see the WampServer icon appear in the systray on the right side of your taskbar. If the icon is green, then everything is working properly. If the icon is orange, then there are issues with one of the services. If the icon is red, then both Apache and MySQL services aren’t running. You will need to resolve those issues before continuing.

# Step 2: Install Wordpress
1. To download WordPress-4.4.2, click download WordPress, you will be directed to a web page. When the page loads, at the top, you will see an arrow pointing downwards, click to download. Check the progress of your download by pressing CTRL + J on your keyboard.
2. Once the download is complete, copy the downloaded file named wordpress.rar to your documents folder.
3 . If you don't have WinRAR installed, download WinRAR and install on your system.
4. Open your documents folder, right click on the wordpress.rar, from the popped up options, select Extract to WordPress, a window will pop up showing the extraction progress. When it finishes the extraction, the popped up window disappears.
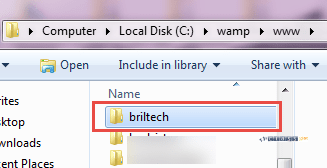
5. Copy the extracted folder named WordPress, open C:\wamp\www and paste the WordPress folder. Rename the folder to briltech.
6. Make sure the Wamp Server is running by checking that the wamp icon is green. if it's not green, click on the icon, select Start All Services.
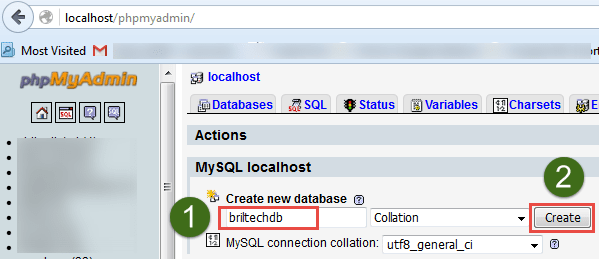
7. Open Firefox, type http://localhost/phpmyadmin, when the page loads, type briltechdb in the textbox and click the Create button.
8. Open a new tab, type http://localhost/briltech, when the page loads, click the "Let's go" button.
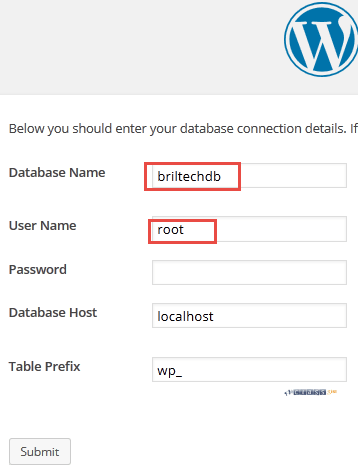
9. On the next page, type "briltechdb" in the Database Name textbox, "root" in the User Name textbox, Make sure the password text box is empty, click the "Submit" button.
On the next page, click the "Run the install" button.
8. On the next page, type "Briltech" in the Site Title textbox, "admin" in the User Name textbox, "Aadministrator@7654@12pas" in the Password textbox, [email protected] in the "Your Email" textbox, click the "Install WordPress" button.
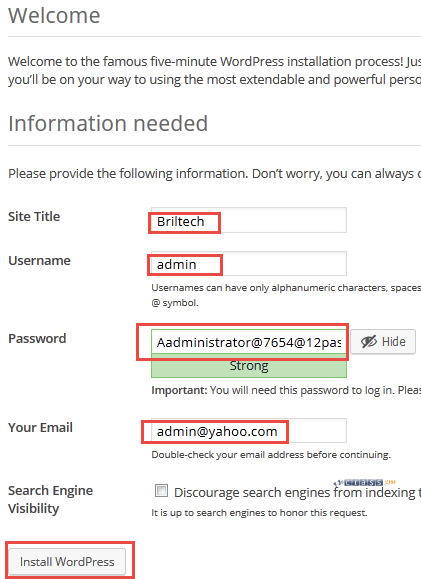
The Success page will display, click the "Log In" button, you will be taken the login page enter "admin" in the Username textbox, "Aadministrator@7654@12pas" in the Password textbox, click the "Log In" button.
Congratulations, you have successfully installed the WordPress software.
#Step 3: Choose and Install a theme
Themes are skeletons to make and customize a website. There are free and paid themes.
For the design of this website, we will be using the Sydney themes. Although you can use any theme depending on the type of website you want to design. Once you learn how to create a website with one theme, you can create any website using any other theme as they are all basically the same process of clicking of buttons/links, installing plugins, adding rows/sections of widgets, dragging and dropping.
For more support on how to configure and use the themes and plugins, you can visit the website of the owners
There are two methods to install a theme
Method 1: Installing the theme when working on your local development environment (localhost)
1. Download the version of the theme used for this demo website here download theme, or you can download the latest version here - http://www.athemes.com (Note: there might be slight changes to what we used, which might change some features of our demo website).
2. Change the file upload size settings of the wamp server.
a. Click on the WampServer icon, go to the php menu, and click on the php.ini option OR Go to C:\wamp\bin\apache\Apache2.2.17\bin, Open the php.ini file, this will open the php.ini file in your plain text editor. Adjust the following settings:
- Increase the maximum size of POST data that PHP will accept – change the value:
post_max_size = 40M (~line 734)
- Increase the maximum allowed size for uploaded files – change the value:
upload_max_filesize = 30M (~line 886)
b. Go to C:\wamp\bin\php\php5.3.5, Open the php.ini file, this will open the php.ini file in your plain text editor. Adjust the following settings:
- Increase the maximum size of POST data that PHP will accept – change the value:
post_max_size = 40M (~line 734)
- Increase the maximum allowed size for uploaded files – change the value:
upload_max_filesize = 30M (~line 886)
c. Restart your server by clicking on the wamp icon and selecting Restart All Services
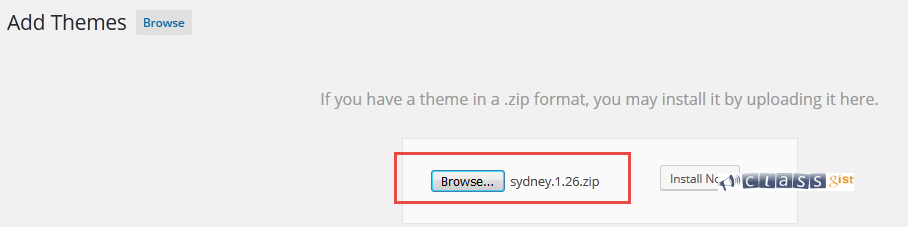
3. If you are not logged into your website. Type http://localhost/briltech/wp-admin. Enter your username and password. Go to Appearance > Themes, it will take you to the "Themes" Page.
Click the Add New button, it will take you to the "Add Themes" Page, click the "Upload Theme" button, click the browse button, navigate to where you downloaded the sydney.1.26.zip file, select it, click the open button and click "Install Now" Button.
On the next page, click the "Activate" link, it will take you back to the "Themes" page, you will see that Sydney theme is the selected theme. You can preview the home page by clicking the "Visit site" link to see how the site looks now.

Method 2: Installing the theme when working online - on a hosted domain (production server)
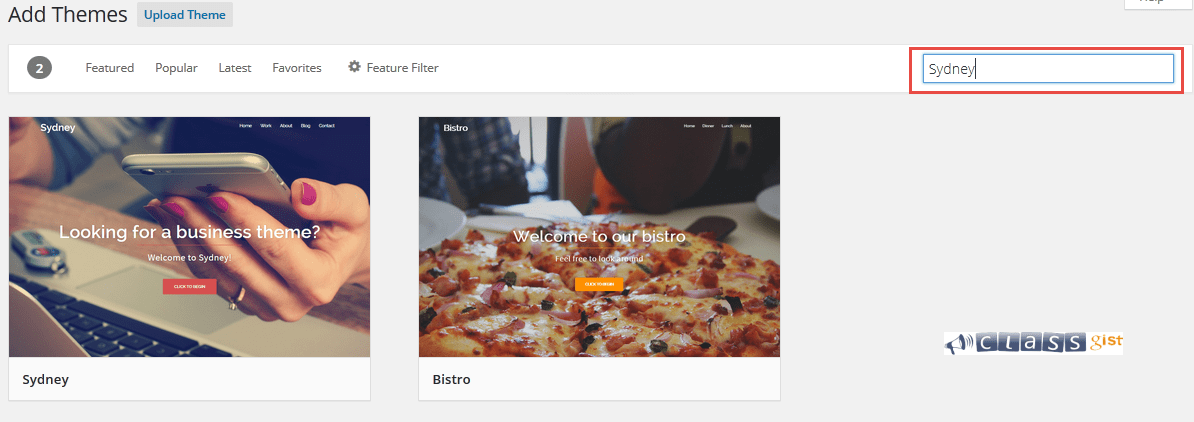
Go to Appearance > Themes, it will take you to the "Themes" Page, Click the Add New button, on the search box, type "Sydney", when the result comes up, hover over the Sydney theme, and click on the "Install" button.
On the next page, click the "Activate" link, it will take you back to the "Themes" page, you will see that Sydney theme is the selected theme. You can preview the home page by clicking the "Visit site" link to see how the site looks.
Congratulations, you have created your first website using WordPress.
What Is Next?
You've now done the basics for your website. The next step is to customize and build a complete website with more features and different pages like the about us page, contact us, blog posts page e.t.c.
Next Step - 1. Customizing your WordPress site